Over the past few years, Large Language Models (LLMs) have evolved from conversational interfaces into legitimate coding partners. Tools like Claude’s Canvas, Cursor, Claude Code, V0, and Replit are democratizing application development at an unprecedented pace.
As someone who learns by building, I’ve created several real-life personal applications—time management tools, child development tracking tools, work related demos and workflow automations—that genuinely make my life easier. More importantly, I’ve taught my non-technical friends to do the same.
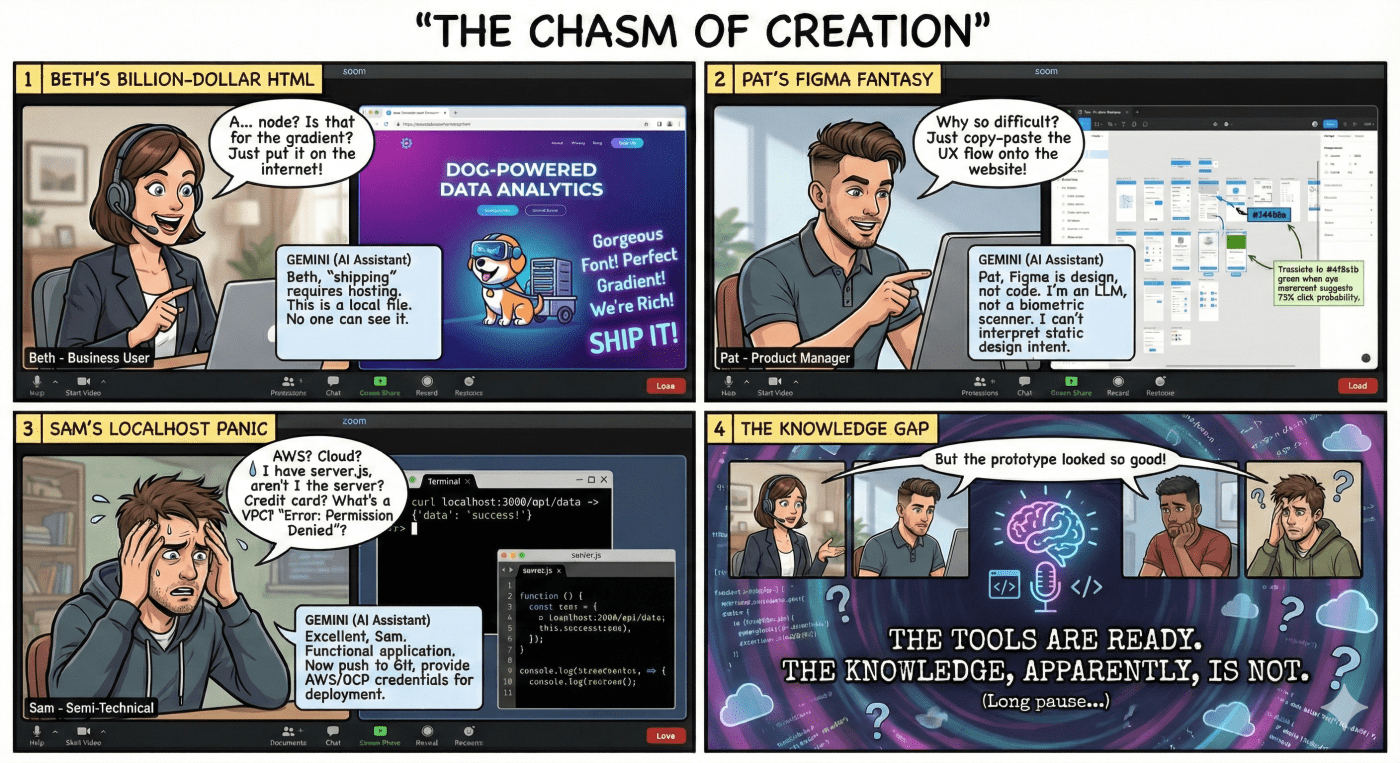
But here’s what I’ve discovered: there’s a massive gap between different skill levels in how people use these AI coding tools. Business users get stuck at the prototype stage. Product Managers (PMs) struggle to go beyond design files. Even semi-technical folks hit walls when it comes to deployment and backend infrastructure.
This guide is my attempt to bridge those gaps and help more people join the creative force of building their own solutions.
🎯 The User Spectrum: Where Do You Fit?
Before diving in, let’s understand the typical journey and where most people get stuck:
| User Type | Prototype Goal/Tool | The Production Gap |
| Business Users | Prototype web pages, architecture diagrams, forms in Canvas/Gemini. | Stop at the local HTML file; can’t distribute. |
| Product Managers (PMs) | Granular design control in Figma, Canva, or V0. | Struggle to bridge the design file to a working application. |
| Semi-Technical Users | Understand high level concepts. Or a specific domain expert (Data, UI/UX, Security etc.) | Hit walls on building on full stack applications like hosting, databases, authentication, and systematic execution. |
| Full-Stack Engineers | Not the target audience; use AI to accelerate workflow. | N/A (Already know the landscape). Maybe keep updated with the latest AI Agent studies or frameworks. |
This guide is for everyone else trying to level up.
Stage 1: From Prototype to Public URL
Let’s start with the most common scenario: you’ve built a static prototype, and now you want to share it with the world.
The Publishing Problem
You have an HTML file on your computer. Great! But how do you give it a real web address that others can visit? This is where most beginners get stuck.
The solution is simpler than you think: Deploy with an AI IDE.
- Open an AI-powered IDE like Cursor, Google’s new Antigravity, or use CLI tools like Claude Code or Gemini CLI.
- Load your HTML file into the project folder.
- Prompt: “Help me deploy this to Firebase Hosting and walk me through the steps”.
- Follow the instructions (create a Firebase account, install Firebase CLI, run deployment commands).
Done—you now have a live URL like yourproject.web.app. This works beautifully for static sites: portfolios, landing pages, or simple interactive tools.
Stage 2: Understanding the Backend Layer
A static frontend is fine for displaying information, but what if you want multiple users to log in, save user-generated data, or provide personalized experiences?
You need a backend—the invisible infrastructure that handles databases, APIs, authentication, and business logic.
The Mental Model
Think of your application like a restaurant:
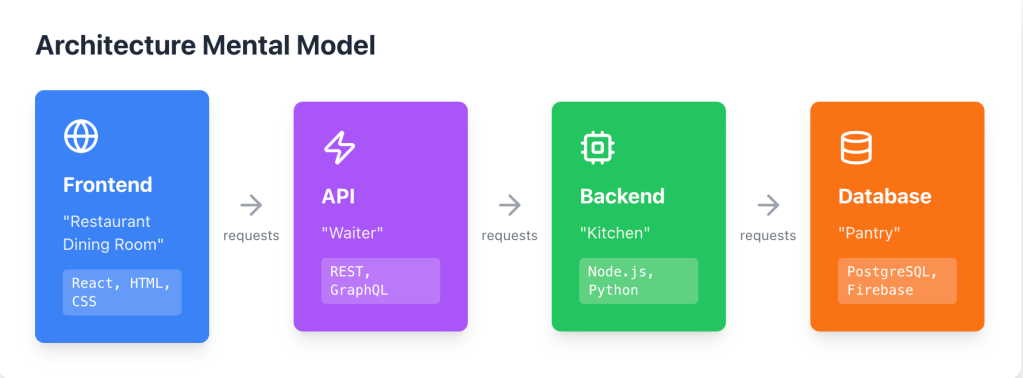
- Frontend = What users see and interact with (the restaurant dining room).
- Backend = Where data is processed and stored (the kitchen).
- Database = Where information lives permanently (the pantry).
- API = How the frontend and backend communicate (the waiter taking orders).
Designing Your Application Architecture
Before asking an AI to build anything, spend time thinking through:
- What data does my application need? (e.g., User profiles, Content, Transaction history).
- What actions should users be able to perform? (e.g., Create, read, update, delete data; Search, filter).
- What are the key user flows? (e.g., Sign up → onboarding → main action → outcome).
I typically start by having a conversation with Gemini, Claude, or ChatGPT:
“I want to build [description of app]. Help me design the data model and list the key functionalities I’ll need.”
You can even feed business problem documents and ask for a complete technical design document. The output will give you a structured blueprint to work from.
Stage 3: Building the Full Application
Now you’re ready to build the real thing. Here is the recommended workflow:
1️⃣ Project Setup
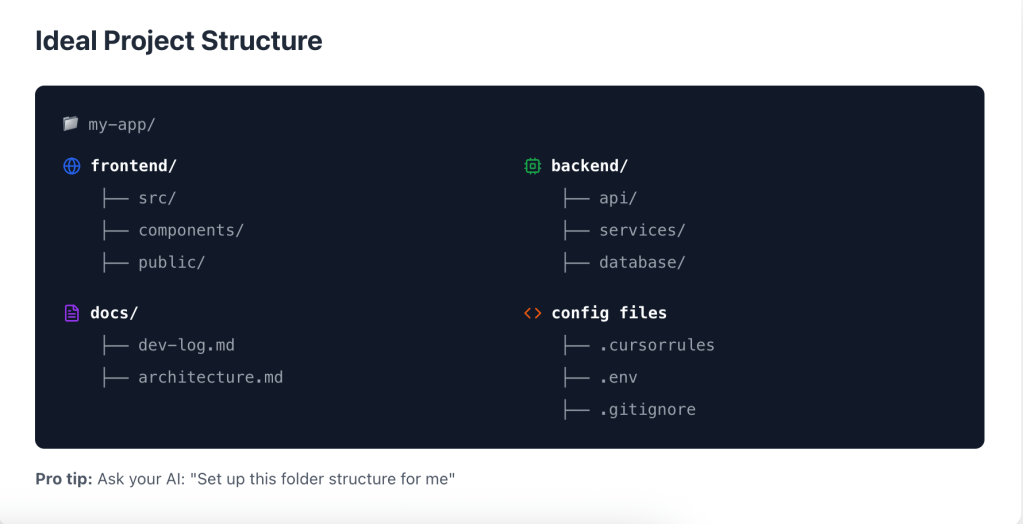
Create a local project folder and gather your materials:
- Assets from Frontend prototype (from Canvas or V0)
- Technical design document (from your LLM conversation)
2️⃣ Choose Your Coding Agent
Pick one: Claude Code, Cursor, Google’s Gemini CLI, or Google Antigravity.
3️⃣ Set Up Best Practices (The Constraint File)
Critical step: Create a .cursorrules (for Cursor) or .claude.md (for Claude Code) file in your project root. This file tells the AI assistant your preferences and constraints, something like:
-
Use TypeScript for all code
-
Follow REST API naming conventions
-
Include error handling in all functions
-
Use Tailwind CSS for styling
-
Prefer functional components in React
-
Keep files under 500 lines
4️⃣ Create a Documentation Workflow
Ask your coding agent to maintain a dev-log.md file where it documents:
- What was built each session
- Key decisions made
- Known issues or TODOs
This becomes invaluable when you return to a project after weeks away.
5️⃣ Implement with fullstack in mind
Work with coding agent and develop the follow components:
| Phase | Goal | Example Prompt |
| Phase 1: Structure | Set up the basic routing and folder structure. | “Create a well-structured project with frontend (React) and backend (Node.js/Express) folders. Set up the basic routing and folder structure.” |
| Phase 2: Database | Set up the database schema based on your data model. | “Based on our data model, set up a PostgreSQL database with these tables: [list them]. Include proper relationships and indexes.” |
| Phase 3: API | Build REST API endpoints with validation and error handling. | “Build REST API endpoints for [specific functionality]. Include input validation, error handling, and proper HTTP status codes.” |
| Phase 4: Connect | Wire up the frontend to call the new API endpoints. | “Based on the design from [your prototype folder], write up the frontend to call these API endpoints. Add loading states and error handling.” |
| Phase 5: Auth | Implement user authentication (sign-up, login, etc.). | “Implement user authentication using [Firebase Auth / Auth0 / JWT]. Include signup, login, and password reset flows.” |
Stage 4: Version Control & Collaboration
Even when you are building solo, Version Control (using Git) is an essential practice that protects your work and streamlines your development process. It’s how professional teams manage their codebase, and your AI assistant can handle the setup.
The Benefits of Using Git
- Experiment Without Fear: Safely create feature branches to try new ideas, knowing you can always roll back if they break something.
- Time Travel: Roll back to previous working versions or inspect exactly what changed and when.
- Collaboration: Coordinate work easily with other developers (or your future self, which is often the most important collaborator).
- Audit Trail: Maintain a clear history of all changes.
Setting Up Git with Your AI Assistant
Use a dedicated prompt to ensure all best practices are followed from the start:
"Set up Git for this project. Create a .gitignore file (for my Node.js/React project). Initialize a remote repository on GitHub. Walk me through the first commit and push to main."
Follow the instructions provided by your AI. You’ll end up with your code safely backed up in the cloud, protected by version history.
Stage 5: Development and hosting
You’ve successfully built a working application locally and set up version control. The final challenge is Deployment—getting your code onto a server so the world can use it.
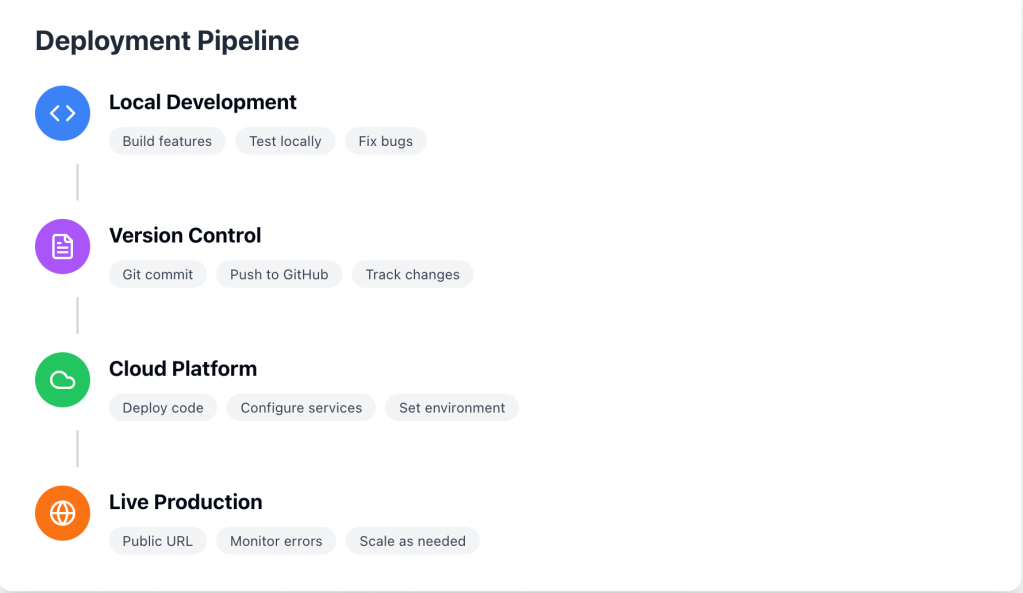
A Typical Deployment Pipeline
This process generally involves three steps: building the code, packaging it (often in a container), and pushing it live.
Option A: Firebase for Simple/Full-Stack Apps
For the vast majority of personal projects and small-to-medium-sized applications, Firebase (Google’s development platform) is the friendliest and fastest path to production.
| Component | Firebase Service | Use Case |
| Frontend Hosting | Firebase Hosting | Fast, secure hosting with built-in CDN. |
| Authentication | Firebase Auth | Ready-to-use user sign-up/login. |
| Database | Firestore | NoSQL database that scales automatically. |
| Backend Logic | Firebase Functions | Serverless functions for running backend code. |
Firebase handles a surprising amount of traffic and complexity with its generous free tier. Don’t dismiss it as “not scalable” until you’re serving tens of thousands of users.
Sample Prompt: “Help me deploy this full application to Firebase. Set up hosting for the frontend, deploy cloud functions for the backend, and configure Firestore for the database.”
Option B: Cloud Platforms for Complex Applications
If you need heavy compute power, advanced networking, or massive data storage, you’ll need one of the major cloud providers (GCP, Azure, AWS). All offer substantial free trial credits.
The key is to start small and use managed services:
- Deploy your backend as a containerized service (e.g., Cloud Run, ECS, or App Service).
- Host your frontend on a CDN (Content Delivery Network).
- Use a managed database (e.g., Cloud SQL, RDS, or Azure Database).
Prompt (Cloud Run Example):
“Help me deploy this Node.js backend to Google Cloud Run. Set up environment variables, configure the Dockerfile, and handle continuous deployment from GitHub.”
The All-in-One Option
If you want to skip the complexity of cloud configuration entirely, platforms like Replit or Bolt handle everything from coding to production hosting in one interface. You literally describe what you want, and they build and deploy it. The tradeoff is less control and potential vendor lock-in.
Stage 6: AI-Powered Applications
Now that you understand the full stack (Frontend, Backend, Database, Deployment), let’s talk about the most exciting step: building applications that leverage AI themselves to provide high-value, intelligent functionality.
From example, leveraging prompt engineering, you’re taking structured data captured by your app, combining it with user context, and asking an LLM to provide expert-level analysis.
💡 Example: Child Milestone Evaluation App
Here is a real-world application built on this pattern that provides genuine, expert-level insight:
| Component | Description |
| The Problem | Tracking my child’s developmental milestones against CDC guidelines and getting actionable, personalized insights, not just a pass/fail grade. |
| The Goal | Generate a professional, evidence-based development report on demand. |
The Solution Flow
- Data Capture: There is a knowledge base, you can ask LLM to capture the CDC guidelines from it’s website and save it in the database. The frontend (a survey interface) collects checked-off completed milestones from the user.
- Data Layer: The backend stores the checklist responses and critical family background information (
[context]) in the database. - The API Call: The application sends the raw survey results (
[data]) and the stored family context to the LLM (Gemini/Claude) via an API request. - The Prompt: “Given these developmental milestone results [data] and family background [context], analyze my child’s development against standard guidelines. Identify any areas of concern, highlight strengths, and provide specific, evidence-based recommendations for activities and next steps.”
- The Output: The LLM’s structured analysis is returned to the backend, which then formats it into a downloadable PDF report for the user.
Stage 7: AI Agents & Advanced Workflows
The next frontier is AI agents—autonomous systems that can use tools and make decisions to accomplish complex tasks.
An AI agent is essentially an LLM with:
- Access to external tools/functions (web search, databases, APIs, calculators)
- The ability to plan multi-step sequences
- Logic to decide which tools to use and when
Frameworks and Tools
Code-Based:
- LangChain: Python/JavaScript framework for building LLM applications
- Google Agent Development Kit (ADK): Powerful Agent Development Framework to facilitate your agent development.
- Model Context Protocol (MCP): Standard for connecting AI to data sources
Low-Code/No-Code:
- n8n: Visual workflow builder with AI nodes
Example Use Case
Imagine a “Research Assistant” agent:
- User asks: “Summarize the latest research on [topic]”
- Agent searches academic databases (tool use)
- Agent fetches and reads relevant papers (tool use)
- Agent extracts key findings
- Agent writes a synthesis report
- Agent saves report to user’s Google Drive (tool use)
This requires orchestrating multiple LLM calls, tool invocations, and decision logic—but frameworks like LangChain make it surprisingly accessible.
✅ Key Principles for Success
After building dozens of these applications, here are my core principles:
- Start with the Problem: Don’t build because you can—build because you should. Focus on repetitive tasks or decisions that could be better informed.
- Prototype Fast, Iterate Faster: Use Canvas or V0 to visualize ideas in minutes. Don’t spend weeks on something before testing the core assumption.
- AI is Your Pair Programmer, Not a Magic Wand: The AI handles syntax and boilerplate; you handle product decisions and architecture.
- Documentation is Non-Negotiable: Keep a dev-log.md. Future you will not remember why you made that decision.
- Security From Day One: Never hardcode API keys. Implement authentication before going public.
- The Best Code is Code You Don’t Write: Use existing services: Firebase Auth, Stripe for payments, SendGrid for emails. Focus on your unique value proposition.
Common Pitfalls to Avoid
- Database Design Mistakes Spending 30 minutes thinking through your data model before you start coding saves hours of migration headaches later. Changing a schema after your app is built is a complex task. Design First.
- Over-Engineering Complexity You don’t need microservices, Kubernetes, or complex architectures for your first app. Start practicing with simple solutions and gradually move into complex applications. Simple is always better than unnecessarily complex. Simple is Good.
- Ignoring Cloud Costs Cloud and AI services are cheap at low scale but can surprise you with unexpected bills. Always set up billing alerts and take the time to understand the pricing model for the services you use. Be Cost-Aware.
- Skipping Error Handling Your “happy path” (the perfect scenario) will work fine. It’s the edge cases and unexpected inputs that break things in production. Ask your AI to add comprehensive error handling to every function. Expect Failure.
- Relying Only on Local Testing Deploy only after you’ve confirmed everything works on your local machine, but never stop there. Cloud debugging is 10x harder. The hosted version can have issues even if local testing passes perfectly, as environments and connected services are different in production. Test Live.
🏗️ Your Next Steps
If you’re reading this and thinking “I want to build something,” here’s what to do:
- Identify a problem you personally experience.
- Open your preferred LLM (Gemini, Claude, or ChatGPT) and describe what you want to build.
- Ask for a technical design document.
- Build the first version. Aim for “works for me,” not perfection.
- Get it online. Deploying something is a psychological milestone.
The barrier to building software has dropped from “years of study” to “clear communication and persistence”. AI coding assistants have created millions of new builders.
The tools are ready. The question is: are you?
Your First Action Item:
Stop reading and start building. That idea you’ve been sitting on? You can build it. Today. Right now.
Note: this blog post is polished with the help of Gemini and Claude.


Leave a Reply